
The Windows File Protection feature in Microsoft Windows prevents programs from replacing critical Windows system files. You may have to turn the feature on or off in certain configurations. You can enable or disable Windows File Protection in Microsoft Windows with a registry edit. Just use these steps.
Note: Windows File Protection is enabled by default in all versions of Microsoft Windows.
This post applies to Windows 10, 8, 7, and Vista.
- Hold the Windows Key and press “R” to bring up the Run dialog box.
- Type “regedit“, then select “OK“.
- The Registry Editor opens. Navigate to the following registry key:
- HKEY_LOCAL_MACHINE
- SOFTWARE
- Microsoft
- Windows NT
- CurrentVersion
- Winlogon
- Look for the key “SFCDisable“and double click on it. If it doesn’t exist, create it by right-clicking the “Winlogon” folder and choose “New” > “DWORD (32-bit value)“
- Set the value to one of the following:
- 1 – disabled, prompt at boot to re-enable
- 2 – disabled at next boot only, no prompt to re-enable
- 4 – enabled, with popups disabled
- ffffff9d – for completely disabled
- 0 – Enabled
- Restart Windows. You may receive a message at startup that says “Windows File Protection is not active on this system. Would you like to enable Windows File Protection now? This will enable Windows File Protection until the next system restart.” Choosing “Yes” will reactivate Windows File Protection and the message will appear at every login until “SFCDisable” is set to “0” again.
Contents
Windows File Protection on Windows 11
With each Windows version, you get a lot of different features. Some features remain the same, while others get a new name. For example, you may have heard of Windows File Protection in previous Windows versions. But with Windows 11, it’s under a new name. Windows File Protection in Windows 11 is called Windows Resource Protection. You couldn’t find it if you’ve been trying to find it with the old name. Windows Resource Protection keeps registry folders and keys, including crucial system files, safe. It stops programs from replacing folders, essential system files, and registry keys that form part of the operating system.
You can only access WRP (Windows Resource Protection)-protected resources through the TrustedInstaller. TrustedInstaller is a process that forms part of Windows Modules Installer and works the same on Windows 10 and 11.
What it does is that it enables the modification, installation, or removal and Windows optional system components or updates. Also, it is not a good idea to disable this helpful tool since you risk not being able to install your Windows updates or remove them.
TrustedInstaller ensures the Windows updates are downloaded and installed correctly onto your computer. It would be best if you never wanted to eliminate TrustedInstaller since it keeps your computer stable, and you can enjoy the latest features included in the updates. It’s a necessary part of your OS since it handles complex operating within your device.
How to Remove Ownership of a File from TrustedInstaller
Suppose you’re confident that TrustedInstaller is responsible for a problem you’re experiencing, and you’re sure you can’t leave things as is. In that case, one thing you can do is remove the ownership of a file that is currently under the Ownership of TrustedInstaller. Taking ownership away from TrustedInstaller is not something that is also recommended since you’re dealing with essential system files and you run the risk of your computer crashing. That means that you’ll end up having to restore Windows 11. But if you want to run the risk, you can change the ownership of a file by going to the file, right-clicking on it, and going to Properties.
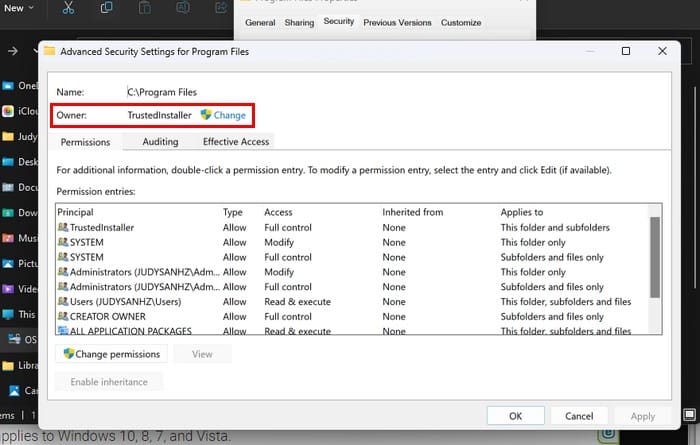
When the Program Files Properties window opens, click on the Security tab, followed by the Advanced button at the bottom right. At the top, you should see that the file’s owner will be TrustedInstaller. Click on the blue Change link to the right.
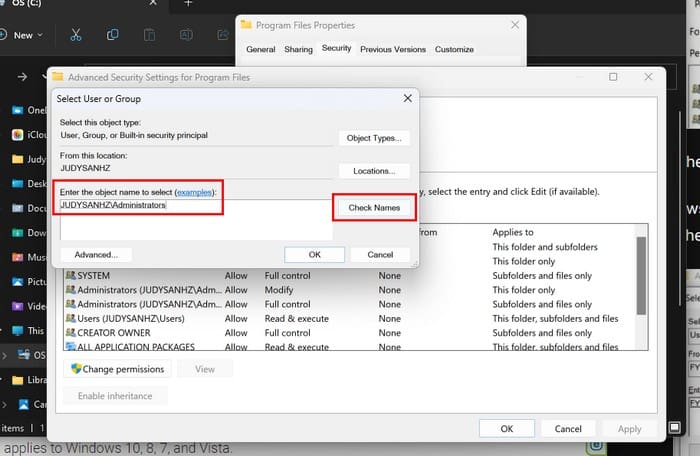
At the bottom, in the box for the option that says Enter the object name to select, type the word administrators, followed by the Check names box to the right. Windows will fill in the rest. Click OK to save the changes.
When the transfer is official, you’ll see your name where it once said TrustedInstaller. Below the new owner’s name, you’ll also see an option called replace owner on sub containers and objects. If you want the ownership change to apply to your files in that folder, click the option. Click Ok to go back to Properties.
In the Group or user names box, click on administrators and ensure that the Full Control option in the box for permissions for administrators is checked. Click Ok as needed, and if you ever want to give TrustedInstaller back the ownership, follow the same steps, but when you get to the text box where you typed administrators, add NT Service\TrustedInstaller.
How to Use System File Checker Scan to Fix TrustedInstaller Issues
Another reason why you may be experiencing issues is that you have some corrupted files that need repairing. Press the Windows + R keys, and the Run dialog box will open. Type cmd, press Ctrl + Shift + Enter, and it’ll open as an administrator. If it doesn’t open as an administrator, try again, but this time, ensure that you press all the buttons simultaneously. When it opens, type sfc /scannow and press Enter. Now would be an excellent time to get that cup of coffee.
How to Disable TrustedInstaller Using Services
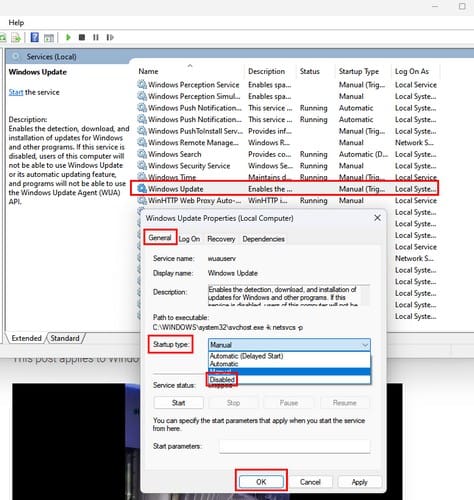
If nothing has changed and you still want to disable TrustedInstaller, you can do so through Services. To open Services, press the Windows + R keys and type services.msc when it opens. Remember to click OK. Scroll until you come across the Windows Update option and right-click to go to Properties. In the dropdown menu for the Startup type, choose Disabled. Click OK, and you’re good to go.
How to Disable TrustedIntaller Using System Configuration
You can also disable TrustedInstaller by going into System Configuration. To get there, open the Run box by pressing the Windows + R keys. Type msconfig and press enter. Click on the Services tab and ensure to uncheck the box for Windows Modules Installer. Click Ok to save your changes.

Conclusion
TrustedInstaller is an essential part of your Windows 11 computer. It’s always best to try to troubleshoot it rather than disable it. But if you know what you’re doing and it’s a must, it could cause serious problems. In Windows 10, it was called Windows File Protection, and now it’s called Windows Resource Protection—New Windows: a new name. How useful do you find TrustedInstaller? Let me know in the comments below, and don’t forget to share the article with others on social media.


In this case Mobile can connect, i want to couldn’t connect any mobile.
I can confirm this also seems to work on windows XP (using it to replace cmd with a fake cmd to troll computer scammers)
when i use this for the first time it worked but now it dont wont to work.