

Emptying out the recycling bin in Microsoft Windows 10 is just as easy now as it was in previous versions. All you have to do is right-click on the recycling bin and choose the option to empty it out. Since you may not always remember to do this, you programmed your computer to do it automatically.
The issue now is that you can’t remember how to undo what you set up. Not to worry, the following guide will show you everything you need to do to cancel it. Disabling the feature can be a lifesaver since it will give you time to recover a file you may have sent to the recycling bin by accident.
The good news is that disabling the recycling bin from emptying out is quick and easy. To get started, press the Windows, and I keys to have the Settings window open. Go to System and then storage.
![]()
The feature that is responsible for emptying out is called Storage Sense. To prevent this option from doing its job toggle it off. If you want to make even more changes to storage sense, click on the option that says Change how we free up space automatically.
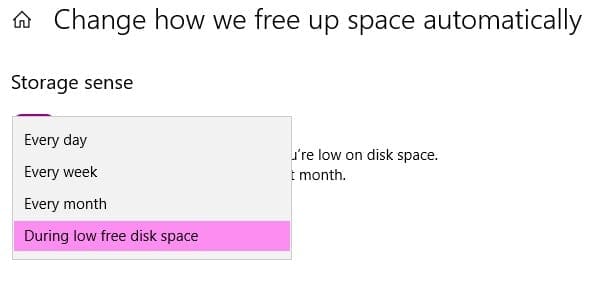
Here you can make changes such as change how often you would like the option to empty out the recycling bin if you were to leave it on. You can choose from options such as every day, every week, every month, and during low free disk space.
There is also a section called Temporary Files. Here, you will see two options. One will let you decide when temporary files should be deleted and the other when files in your Downloads folder should be deleted.

To have Storage sense stop working, make sure to have this last option to never, after clicking on the drop-down menu. At the very bottom, there is also an option to use the storage sense right there and then.
Another way you can disable the recycling bin is by accessing its properties. Right-click on the recycling bin icon and click on Properties. Choose the drive you want to turn it off for and choose the option that says Don’t remove files to the Recycle Bin, Remove files immediately when deleted.
![]()
If you want to disable the recycling bin for all drives, you will need to repeat this step for each drive.
Conclusion
As you can see, preventing your Windows 10 computer from emptying out the recycling bin is very easy. Both options mentioned here are quick and beginner friendly. Which method are you going to try first? Let me know in the comments below.


This did not help. In “Configure Storage Sense or run it now”, under “Delete files in my recycle bin”, I had already checked “never”. However, the files continue to be deleted at the 30 day mark.
My Storage Sense was already set to OFF and it STILL deletes all my files in the Recycle Bin without asking! Tried to restore a file I just deleted days ago and it’s GONE along with every other file in the recycle bin!